Detailed instructions for building the user-defined scattering routine
1. Introduction.
In the 'special' scattering versions of the CPO programs the user supplies a routine called scatter2.cpp or scatter3.cpp (for the CPO2D and CPO3D programs respectively) that needs to be built into the 'direct-linked-library' routine scatter2.dll or scatter3.dll that can be called by the programs.
Instructions for this building will be given in section 6 below, after details about other relevant matters.
2. Input and Output parameters.
For the CPO3D programs:
The program will send 38 parameters to the user-supplied routine.
The first 13 are parameters evaluated at the beginning of the latest trajectory integration step:
x, y, z, vx, vy, vz, energy, potential, time, current, charge number, atomic mass number, local charge density
These 13 parameters are held in array scatter_params_in1.
The next 16 parameters are also held in array scatter_params_in1, but are used only in conjunction with the stochastic scattering option.
The last 9 are parameters evaluated at the end of the step:
x, y, z, vx, vy, vz, energy, potential, time.
These parameters are held in array scatter_params_in2.
Please note that before the stochastic scattering option was introduced in Nov 2001 there were only 13 parameters in array scatter_params_in1, and so users who are updating or upgrading after that time must change their scattering cpp’s and dll’s accordingly.
The program expects to receive 12 output parameters from the user-supplied routine. The first 10 are:
x, y, z, vx, vy, vz, time, current, charge number, atomic mass number
These 10 parameters are held in array scatter_params_out
The last 2 output parameters are 2 logicals:
stop_ray and scatter_action
which are held separately.
The program will stop the ray if stop_ray = .true.
If scatter_action = .true. the program will look at the following output parameters:
x, y, z, vx, vy, vz, time
If the space-charge version is in use the program will also look at the output parameter:
current
If the variable mass option has been triggered the program will also look at:
charge number, atomic mass number
The program will automatically evaluate the kinetic energy (relativistically, if necessary) and will also re-evaluate the potential if the coordinates have changed.
For the CPO2D programs:
The 2D version has the analogous 18 input and 10 output parameters (that is, x, y and z are replaced by r and z, and vx, vy and vz are replaced by vr and vz).
3. Example routines:
The program package contains 8 examples of user-supplied routines.
4. Control data.
The user supplied scattern.cpp (where n = 2 or 3) can read data from an external file, if desired. The user specifies the name of this file in the data-builder (eg scatter2.dat or scatter3.dat). It must be in the same directory as the CPO execution files (which is usually the c:\cpo\ directory).
5. Essential files.
The files scatter2.dll and/or scatter3.dll must be in the same directory as the CPO execution files.
The control data files scatter2.dat and scatter3.dat must also be in the same directory as the CPO execution files.
Other files that are needed (and which could be in other directories) are:
(1) the source files scatter2.cpp and scatter3.cpp mentioned above,
(2) the files scatter2.dsw and scatter3.dsw that are called when scattern.cpp is changed, and
(3) 6 further files that are needed for the building the dll file, namely stdafx.cpp, stdafx.h, scattern.dsp and scattern.h where n = 2 or 3
All these files are automatically downloaded from the CD. The .dsw, .dsp and .h files are read-only files, as is the stdafx.cpp file. The user should be careful to make copies of the .cpp and .dat files that are not read-only before they are altered.
6. Building the dll file, and making changes to the user-supplied scattering routine, if necessary.
(1) Make a copy of the .cpp file that you are going to change.
(2) Make sure that Visual C++ is present on the computer. Using Windows Explorer or My Computer, double-click on the file scattern.dsw (the Visual C++ project file) and the Visual C++ environment will load up as follows:
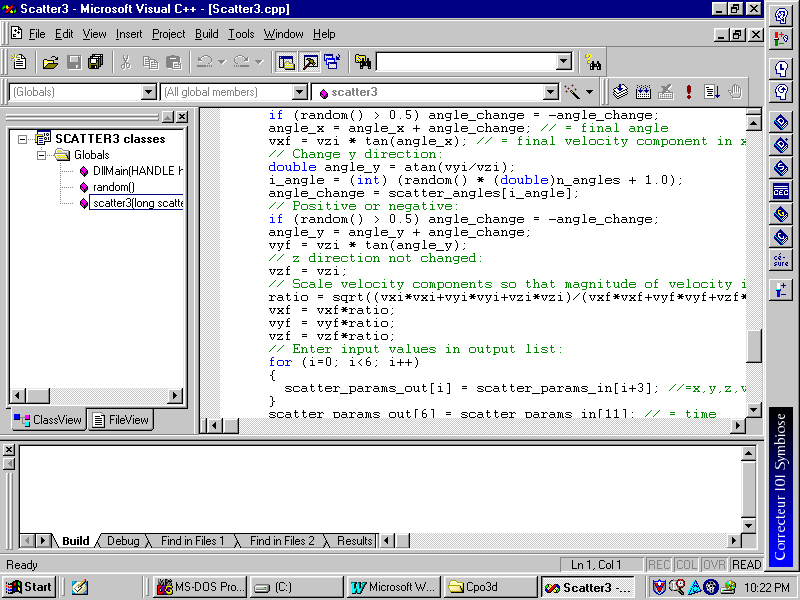
If the source code is not present in the editor window, click once on the scattern.cpp file as show in the screen capture above.
(3) Make the changes to the source code (if any are required). The scattern.dll can now be re-built. To do this press F7 or click on Build/Build scattern.dll/.
(4) If scattern.cpp has recently been overwritten with a new routine it is necessary to click on Build/Rebuild All. If an error message concerning the vc60.pdb file appears then try Build/Clean, followed by Build/Rebuild All.
(5) The new scattern.dll can then be found in the subdirectory c:\cpo\debug\ (if you are working from c:\cpo\).
(6) The new scattern.dll should then be copied back to the directory that has the execution files (usually c:\cpo\). You might have to be in MSDOS to do this. After scatter2.dll or scatter3.dll have been created they might be ‘hidden’ files, in which case they would have to be dealt with as follows before they can be copied to another directory:
(a) Go to My Computer or Windows Explorer.
(b) Select View/Folder Options.
(c) Select the middle tab ‘View’.
(d) Select ‘Hidden files’/’Show all files’.
(e) Unselect ‘Hide file extensions for known file types’.
(7) You can then run the CPO program. Suitable test files are xmpl2d30.dat, xmpl2d31.dat, xmpl3d50.dat and xmpl3d51.dat.
7. Debugging scatter2.cpp or scatter3.cpp.
These instruction apply to the 3D program, but the instructions for 2D are analogous.
It is assumed that the directory cpo contains cpo3d.exe, scatter3.cpp, scatter3.dll, scatter3.dsw and scatter3.dat. The data file, such as xmpl3d50.dat or xmpl3d51.dat, should be copied to the cpo directory. If another directory is used, it should contain all these files.
Step 1: Load up the Visual C++ environment and load up the scatter3 workspace (eg by double clicking on scatter3.dsw).
Step 2: Select the option PROJECT->SETTINGS and set the executable program as follows:
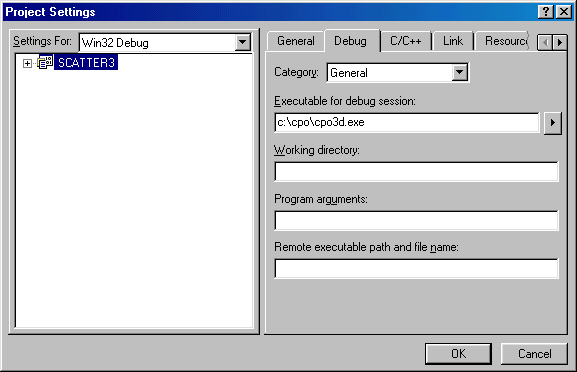
Note that the executable that will call the scatter3.dll is set in the box labelled Executable for debug session.
This step will only have to be done the first time.
Place the cursor on the line of the scatter3.cpp program you are interested in debugging and press cntrl-F10 (run to cursor). The cpo3d program should then load. Run the CPO3D program in the normal way, giving it the data file (eg xmpl3d50.dat) as its input file. When CPO3D calls the DLL it should pause the execution of the program at the line where the cursor was placed.
Once the program has paused on the line in the scatter3.cpp, the single-step facilities should work (to see what these are select Debug on the menu). To inspect the value of a variable or array, hold the mouse over the variable and its value will be displayed.
Return to scattering option.